Kitchen screen
The kitchen screen helps your team track item queues in real time, update statuses, and control preparation timing.
It is a modern digital replacement for paper kitchen runners/tickets and reduces information loss between service and kitchen teams.
We recommend this workflow as the default daily approach because it gives full visibility into priorities, statuses, and delays for each item.
For stable operation, use dedicated kitchen hardware (tablet, monitor, or separate terminal) with the “Kitchen screen” page always open.
Contents:
- What it is and when to use it
- Prerequisites
- How to open the kitchen screen and verify it is ready
- How to change item statuses
- How to manage display options and additional actions
- Common issues and fixes
- Related articles
What it is and when to use it
- Use “Kitchen screen” when you need to process items by stages: “Waiting” -> “Cooking” -> “Ready to serve”.
- It is especially useful during peak hours when you need a clear live queue.
- This flow is intended for chefs, sous-chefs, and managers supervising kitchen execution.
Prerequisites
- The worker has the “Kitchen screen” permission.
- To change item statuses, the worker needs “Change order statuses”.
- To use “Make semifinished product”, you need:
- at least one semifinished product configured;
- the “Make semifinished products” permission.
- The venue must have at least one cooking place configured with “All statuses”.
How to open the kitchen screen and verify it is ready
Open “Kitchen screen” from the left navigation menu.
If multiple kitchens are configured with full statuses, select the required kitchen tab at the top.
Confirm the three working columns: “Waiting”, “Cooking”, and “Ready to serve”.
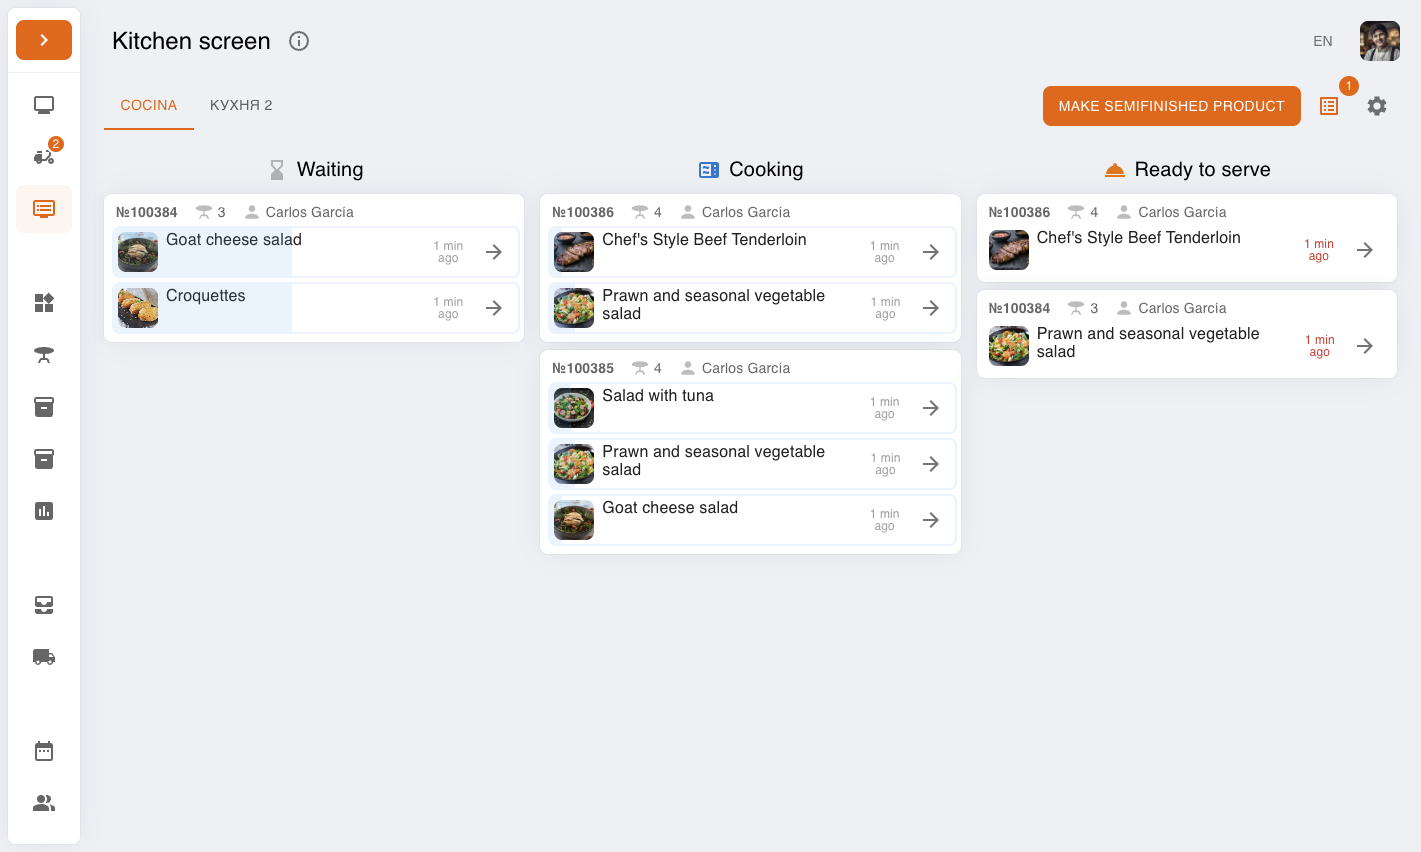
How to change item statuses
Find the needed item in the order card. Each item shows its name, modifiers/comment, and elapsed time.
Click the item (arrow button on the right) to move it to the next status.
Full status flow: “Waiting” -> “Cooking” -> “Ready to serve” -> served (item disappears from the kitchen screen).
If queues are used, items in “Queue 2” and “Queue 3” become active only after the previous queue is completed.
How to manage display options and additional actions
Click the Settings icon (gear) in the top-right area.
Enable or disable:
“Display progress bar” to show timing and overdue highlights.
“Display additional information” to show order number, table, and worker.
Click the list icon to open “Stop/Hot lists” and manage item availability.
If needed, click “Make semifinished product” (visible only when semifinished products exist and permissions allow it).
Common issues and fixes
-
Issue: There are no orders on the screen or a message appears about missing cooking places.
Fix: Check cooking place configuration. At least one place must be set to “All statuses”. -
Issue: A specific item does not appear on the kitchen screen.
Fix: Verify the item is assigned to the correct cooking place and that the correct kitchen tab is selected. For business lunch items, verify kitchen assignment on the slot option. For table orders, confirm the order has already been sent to work (not left in the initial state). -
Issue: You cannot click an item to move its status.
Fix: Check that the worker has the “Change order statuses” permission. -
Issue: The “Make semifinished product” button is missing or disabled.
Fix: Add semifinished products in settings and check the “Make semifinished products” permission.