Kitchen screen setup
This article covers hardware and “station” preparation: what to leave running in the kitchen, what must be configured in FireMenu before Kitchen screen works, and how the display switches (progress bar and extra information) behave—they are saved per browser on the device.
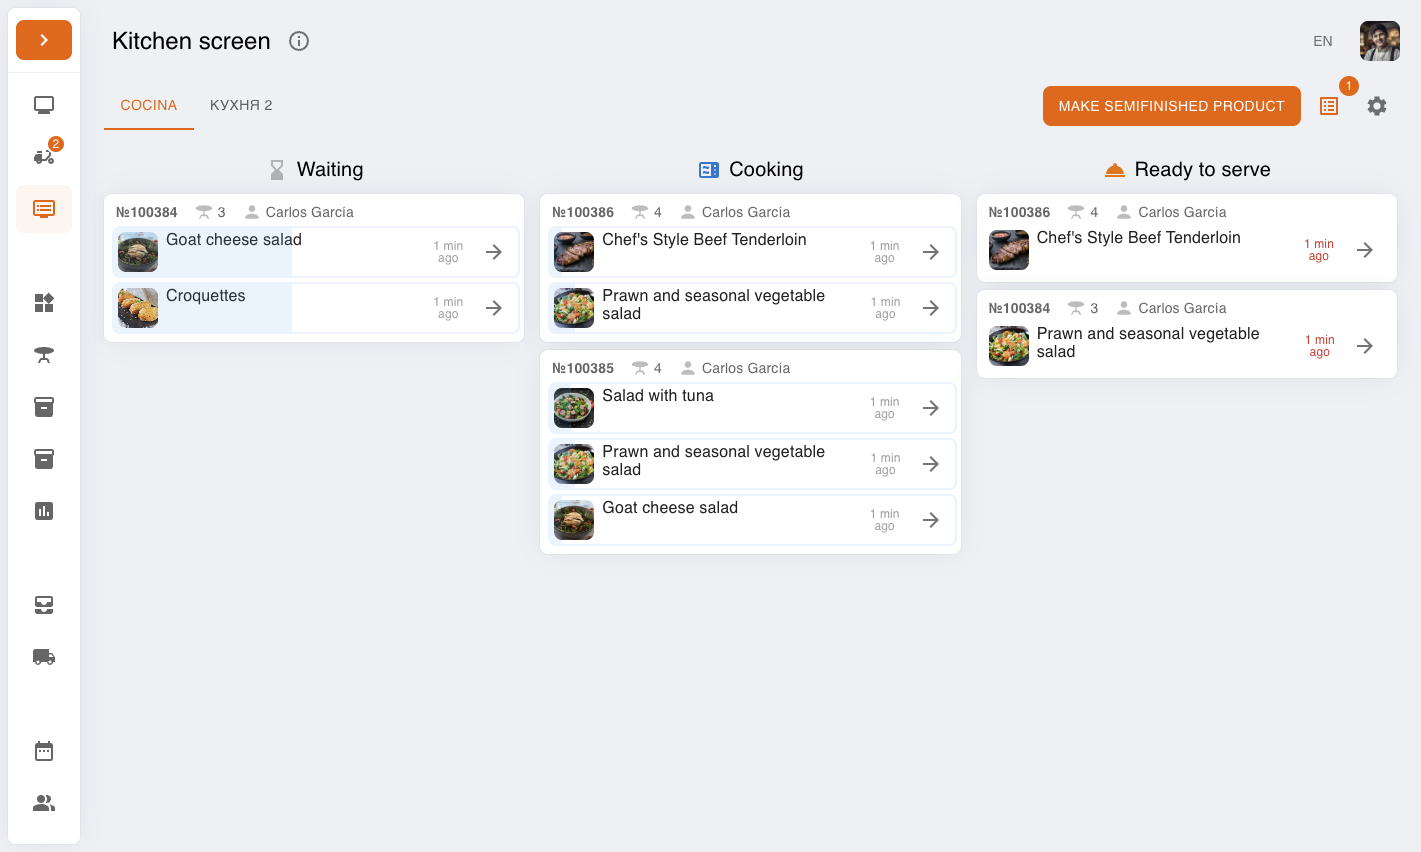
For day-to-day flow—columns, statuses, stop/hot lists—see Kitchen screen (daily use).
Contents:
- Why use a dedicated device
- What must be ready in the product
- How to open the screen on the station
- Multiple cooking places (tabs)
- Gear icon: progress bar and extra info
- Common situations
- Related articles
Why use a dedicated device
- Lower risk of the tab being closed than on a shared office PC.
- Better ergonomics—wall monitor or shelf-mounted tablet; the kitchen team does not have to flip between POS and kitchen on one screen.
- More stable Wi‑Fi—check signal in the kitchen area; freezes are often network-related rather than “kitchen logic”.
If several people share one station with PINs, see Multi-user terminal.
What must be ready in the product
- PLUS plan or higher—the Kitchen screen area is gated by subscription tier.
- Kitchen screen permission on the worker profile you use to sign in on the kitchen device.
- At least one cooking place whose status mode is All statuses. Otherwise you see a message like: there are no cooking places with all statuses—create a place and choose All statuses to use the kitchen screen. Configure this under Kitchen places and statuses.
- Dishes (and business-lunch options) must be routed to the right cooking place, or cards will not appear for that zone.
How to open the screen on the station
- Sign in to the venue with an account that has Kitchen screen access (normal sign-in or multi-user terminal—your choice).
- In the left sidebar, in the upper block of items, open Kitchen screen (next to POS terminal and, on eligible plans, delivery).
If no shift is open and the worker lacks Access without shift, you will see the standard shift prompt—this is general access behaviour, not a kitchen bug.
Multiple cooking places (tabs)
When the venue has several cooking places set to All statuses, tabs with their names appear at the top. The selected tab filters cards to that zone’s items across the three columns (Waiting, Cooking, Ready to serve).
Places set to Waiter statuses only or Without statuses do not appear on the kitchen screen—those modes support other flows (see Kitchen places and statuses).
Gear icon: progress bar and extra info
In the top-right of the kitchen screen, tap the settings (gear) icon. The menu offers two switches (wording matches the app):
- Display progress bar—shows the time-based progress bar on cards where the UI supports it.
- Display additional information—adds extra context on the card (order number, comments, etc., depending on context).
Switch state is remembered for this browser on this device. If you open Kitchen screen in another browser or after clearing site data, set the switches again.
Next to the gear you may also see Stop/Hot lists with a badge and Make semifinished product when semifinished items exist and the worker has permission. How to use those in service is covered in Kitchen screen (daily use).
Common situations
- Empty view with grey text about no “all statuses” places. Create or edit a cooking place and set All statuses—see Kitchen places and statuses.
- No tabs between kitchens though you have several “places”. Likely only one place uses All statuses; others are excluded from this screen.
- Gear switches “reset” after a browser update. They do not sync across devices; confirm you did not clear site data and you are in the same browser.
- No “Kitchen screen” in the menu. Check plan (PLUS), Kitchen screen permission, and the worker role.
Related articles
- Kitchen screen (daily use)—statuses, stop/hot, semifinished flow.
- Kitchen places and statuses—place name, All statuses, kitchen ticket printing, dish routing.
- Multi-user terminal—shared station with PINs.
- Printer setup—if you print paper tickets from the kitchen.